Quickstart step 4 : React Native Integration (IOS)
Here are the steps required for a minimum integration of the Veery Geo-predictive SDK inside your React Native application.
Prerequisites
You should have requested your Developer API Key and received it in the following format:
| YOURCOMPANY ACCESS KEY | Where to use in Xcode | Value (example) |
|---|---|---|
| CLIENT_ID | info.plist | 00000000-1234-abcd-efbh-1234567890ab |
| API_KEY | info.plist | abcdef12-0123-4567-890a-bcdef1234567 |
| API_SECRET | ViewController.swift -> veery.setApiKeySecret(..) | SuPeRScrET12345789GhJ |
These will be used in the next steps of the Veery integration.
Install react-native-veery
$ npm install
$ npm install react-native-veery --save
Note
To update react-native-veery, run the following
$ npm update react-native-veery --save
Automatic installation
You can skip the manual installation if you use
$ react-native link react-native-veery
Manual installation
- In XCode, in the project navigator, right click
Libraries➜Add Files to [your project's name] - Go to
node_modules➜react-native-veeryand addRNVeery.xcodeproj - In XCode, in the project navigator, select your project. Add
libRNVeery.ato your project'sBuild Phases➜Link Binary With Libraries - Run your project (
Cmd+R)<
Podfile
If you have already installed Pod :
-
Open your Podfile

-
there are two way to add Veery framework
a. using veery pod directly
    platform :ios, '8.0'
        source 'https://github.com/roofstreet/cocoa.repo.git'
        target  'yourApp' do
            # Comment the next line if you're not using Swift and don't want to use dynamic frameworks
            use_frameworks !

        # Pods for yourApp
            # You should use always the last version of Veery.
            pod 'Veery', 'X.Y.Z'

        end
Note : "X.Y.Z" should be replaced by the latest ios release.
b. using RNVeery podspec path
     platform :ios, '8.0'
     source 'https://github.com/roofstreet/cocoa.repo.git'

     target  'yourApp' do
         # Comment the next line if you're not using Swift and don't want to use dynamic frameworks
         use_frameworks !

     # Pods for yourApp
         pod 'RNVeery', :podspec => '../node_modules/react-native-veery/ios'

     end
If you are adding more than one Pod you must add the following in the top of the Podfile
source 'https://github.com/CocoaPods/Specs.git'
- Close your Xcode and in the console run
$ pod update
to download Veery.
Otherwise you should install pod in your Xcode project directory.
1. Run
     $ pod init

     $ pod install
in your project directory using a console.
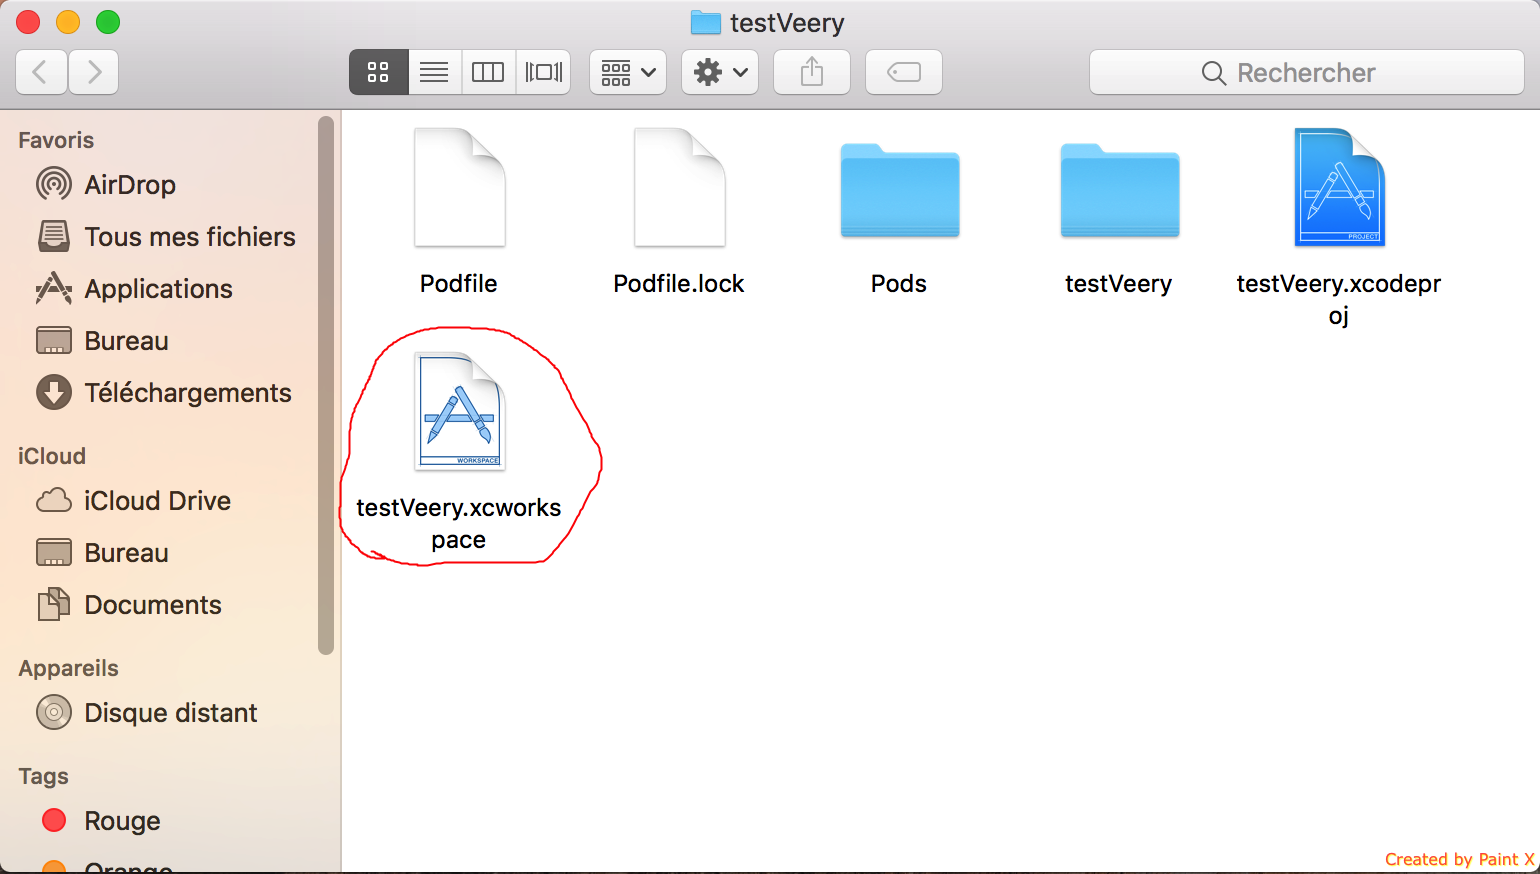
2. Open your Xcode project directory and lunch yourApp.xcworkspace
3. Execute the cited instruction above.
For more information see cocoapod.org.
PS :
If you never insalled Cocoapod you should intall it with the following
$ sudo gem install cocoapods
Create empty swift file
If there isn't any swift file in your project, create a Swift file (Empty file) in your project.
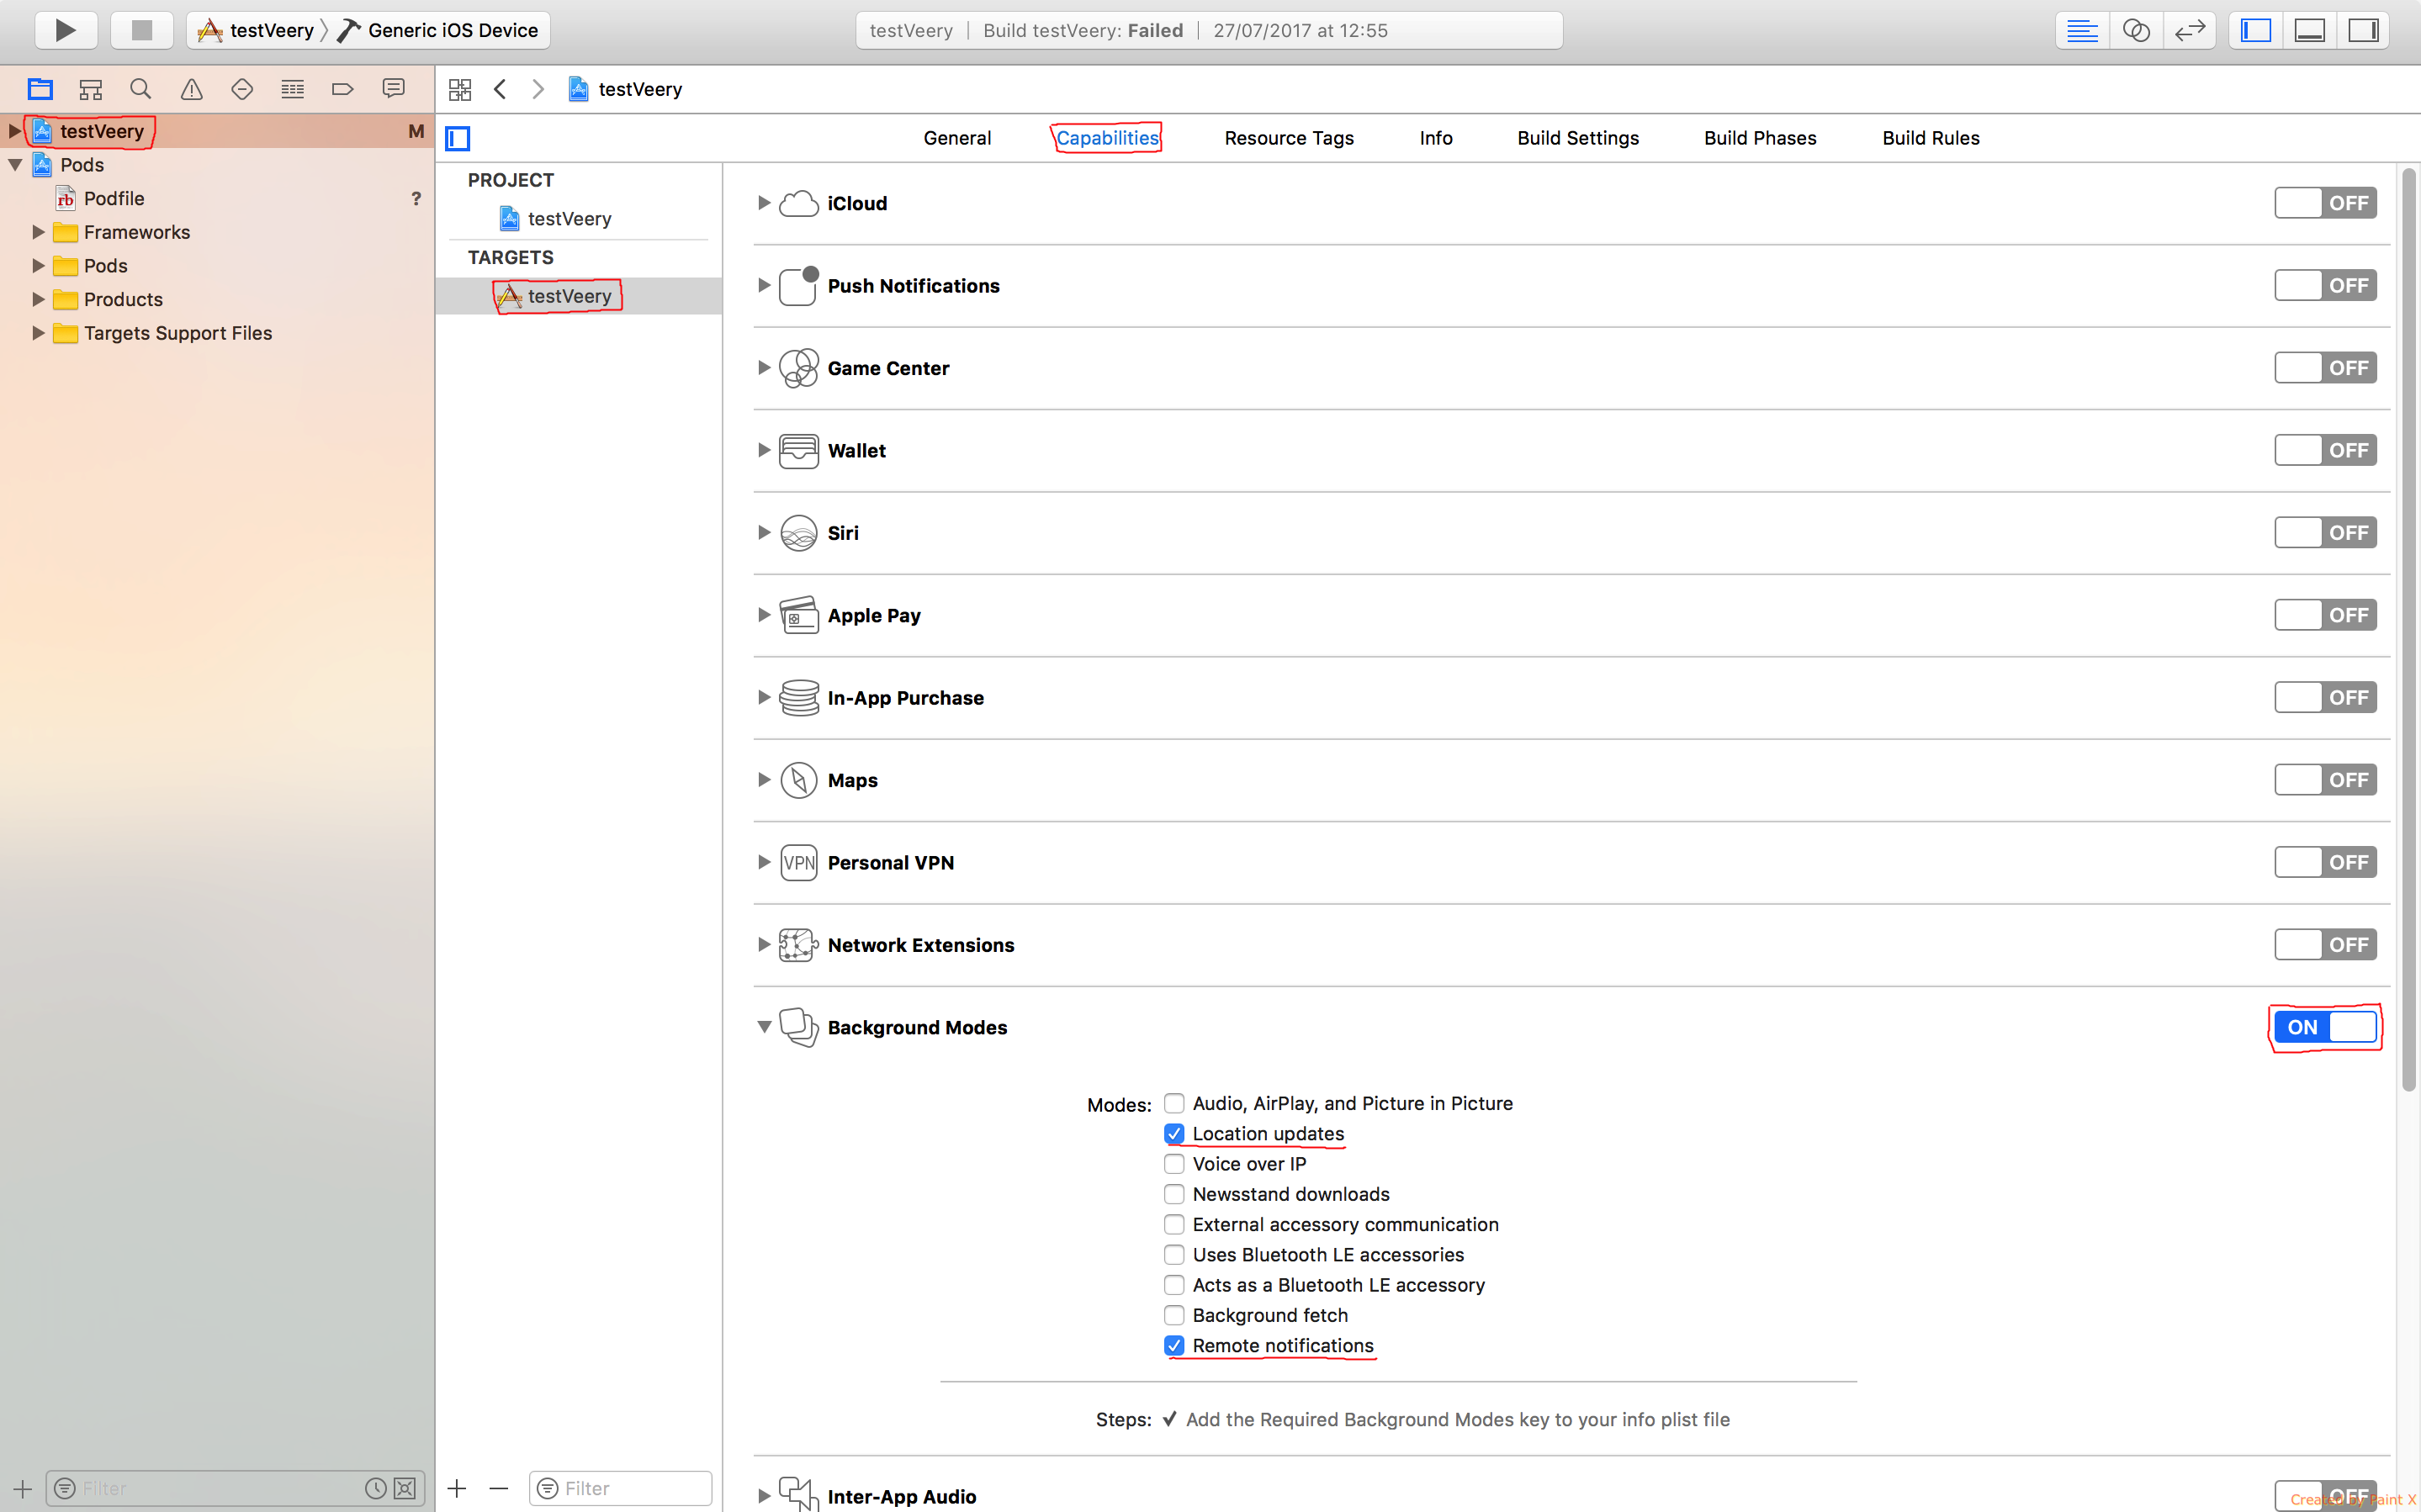
Activate Background Modes
- Select the project from the Project Navigator
- Select the app target.
- Select the Capabilities
- Turn on the Background Modes
- Check the Location updates and the Remote notifications modes.
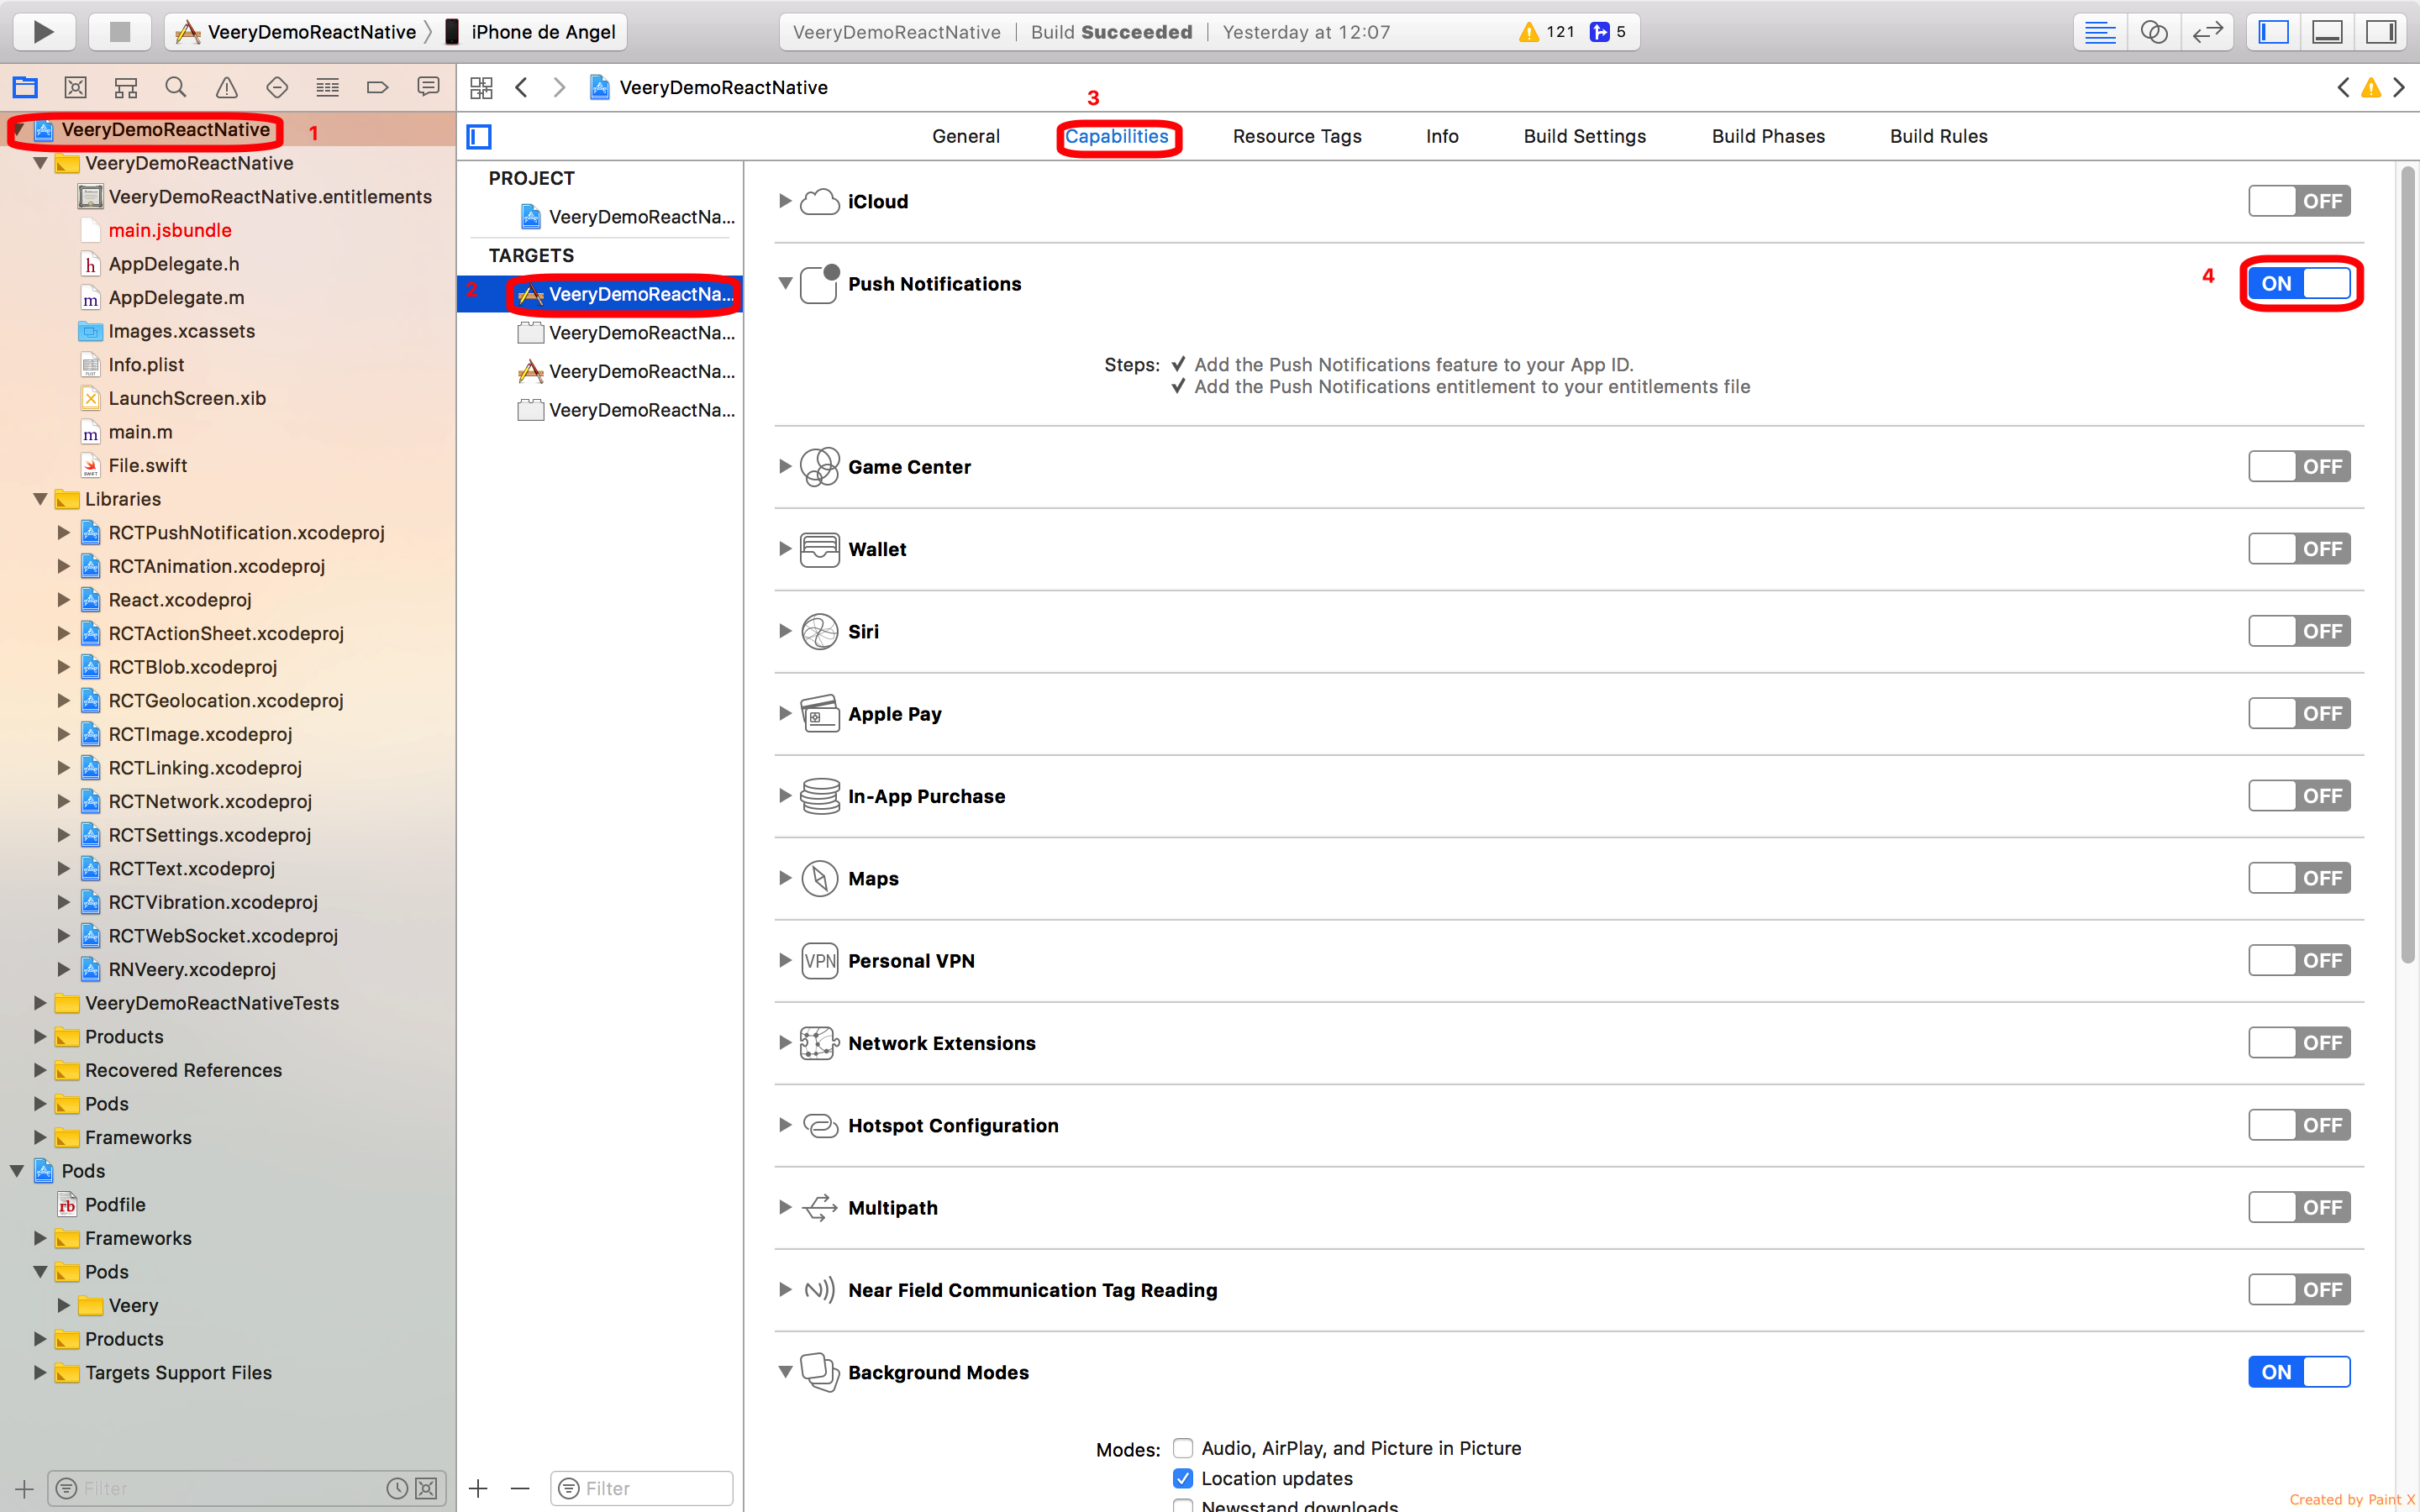
Activate Push Notifications
- Select the project from the Project Navigator
- Select the app target.
- Select the Capabilities
- Turn on the Push Notifications
Info.plist
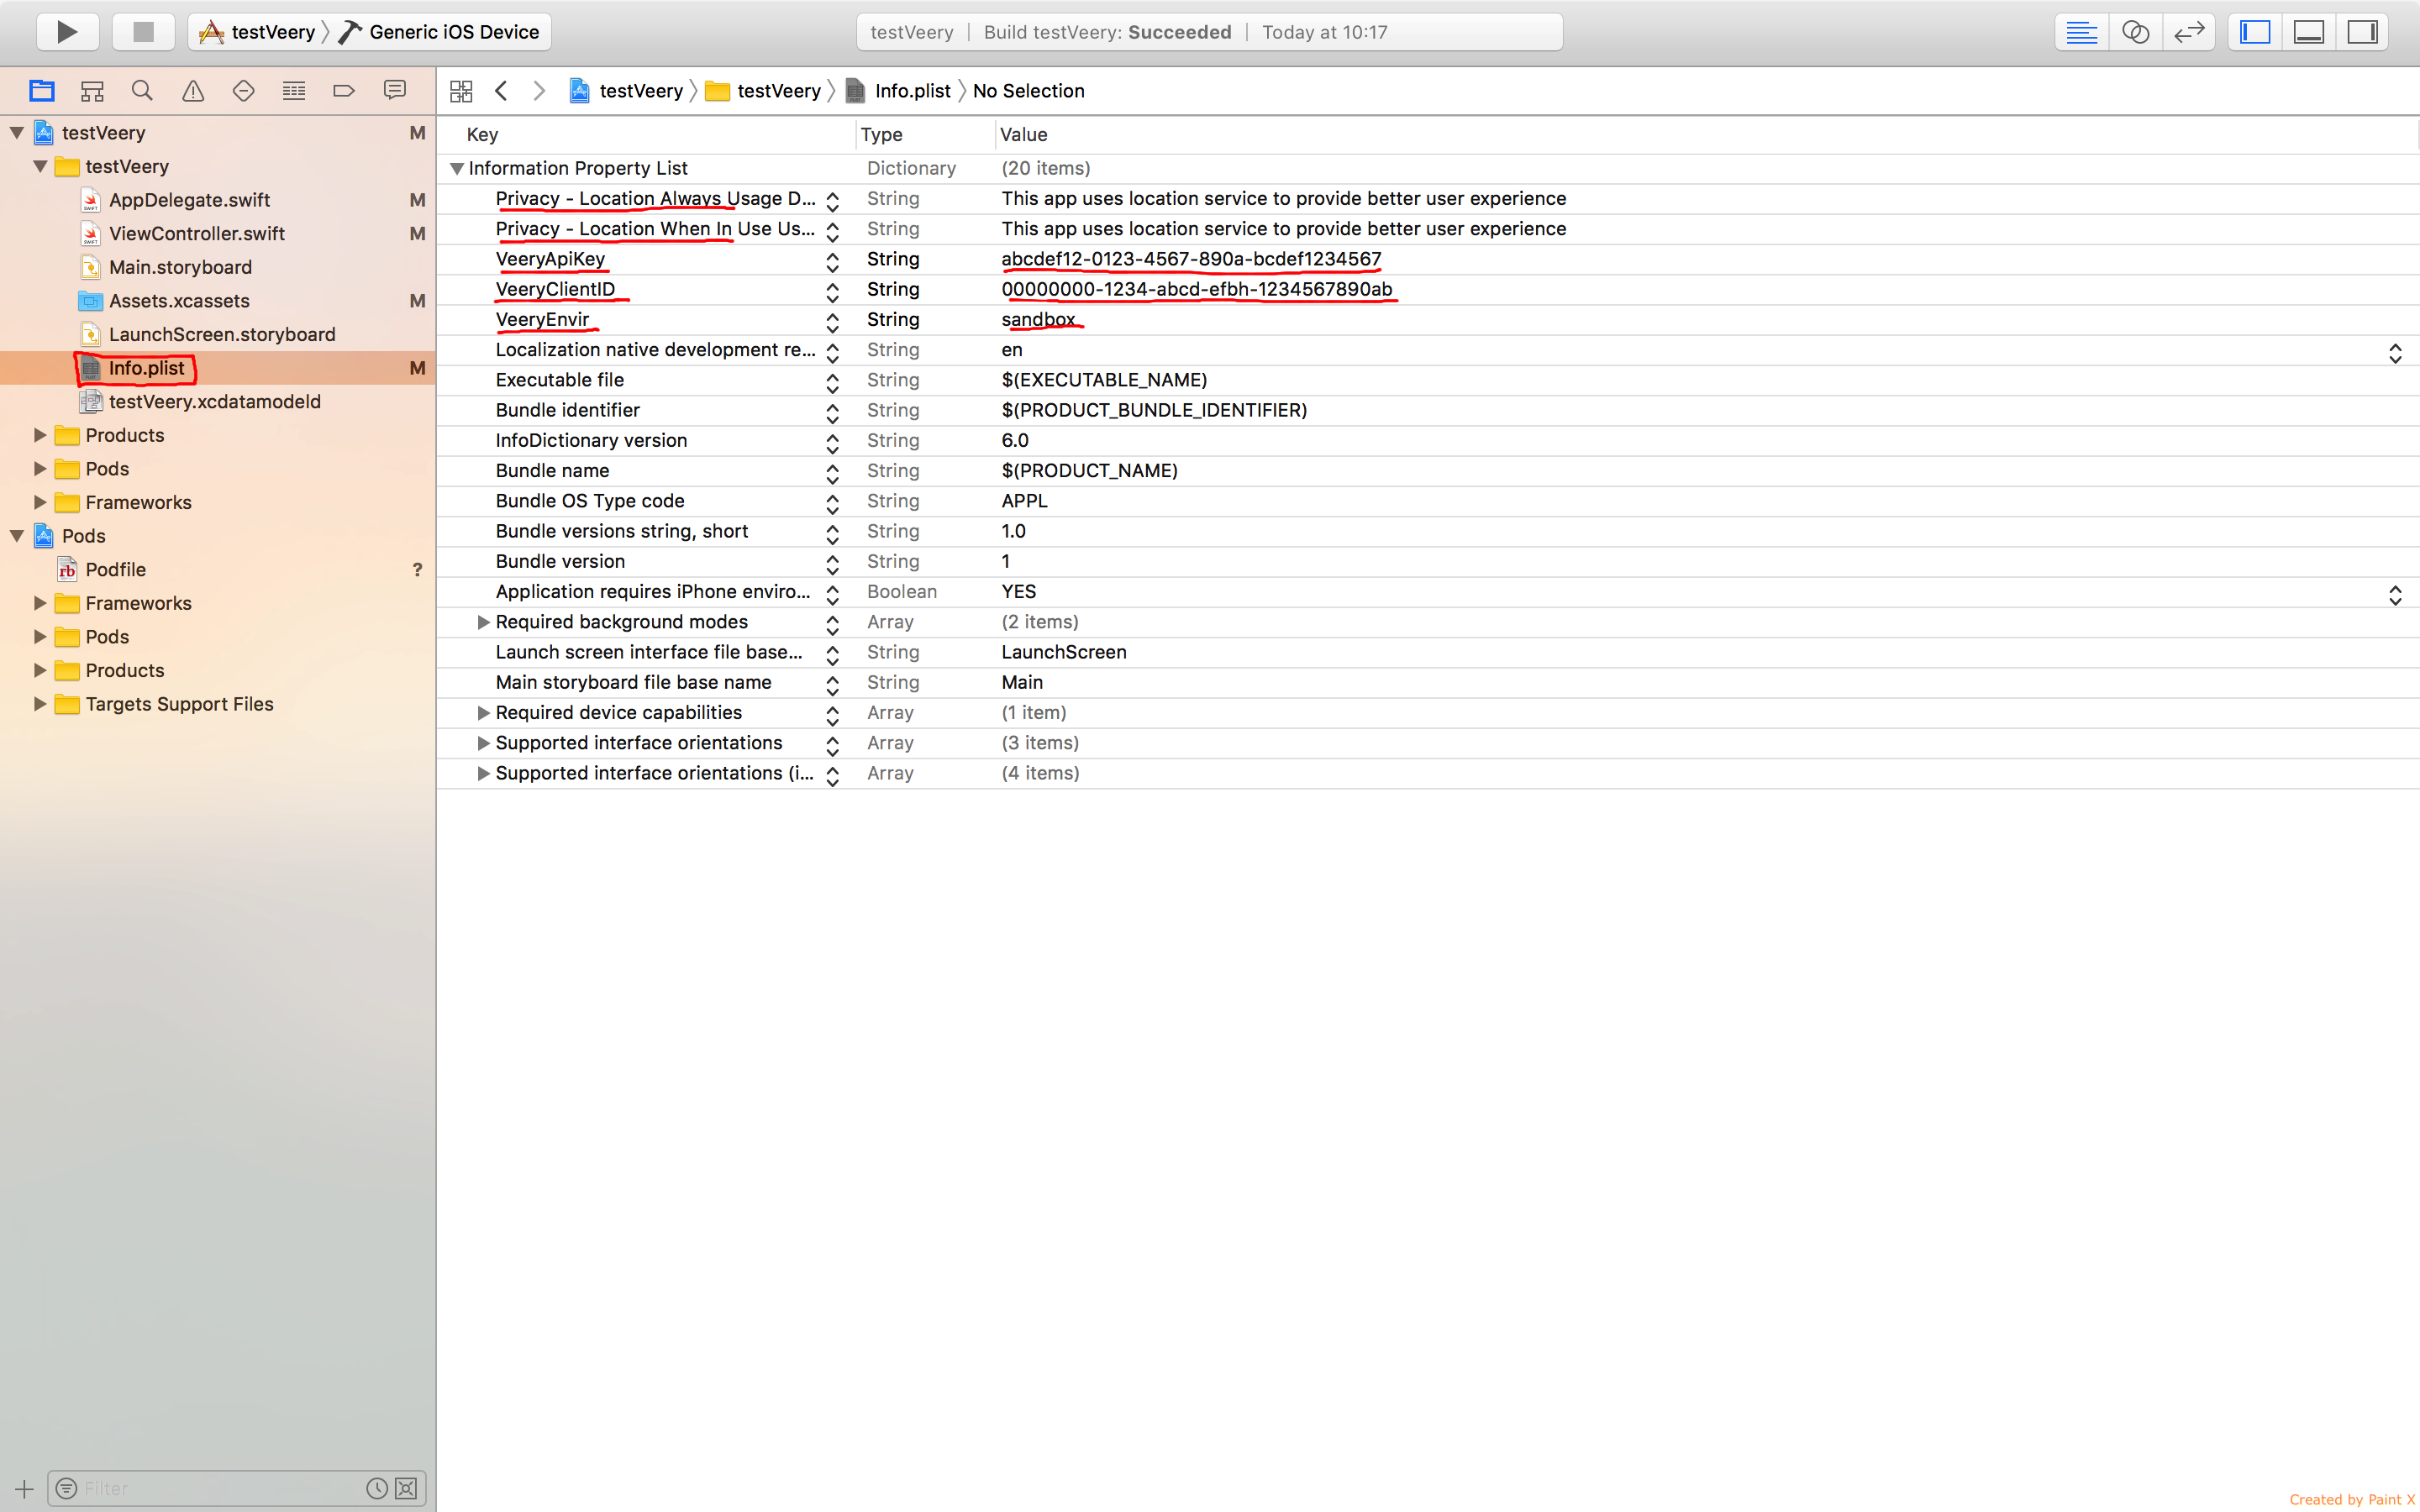
In your info.plist file you should add the following (using the credentials received from your API KEY registration).
| Key | Type | Value |
|---|---|---|
| VeeryApiKey | String | abcdef12-0123-4567-890a-bcdef1234567 |
| VeeryClientID | String | 00000000-1234-abcd-efbh-1234567890ab |
| VeeryEnvir | String | sandbox |
For using Location updates you should add the following in your Info.plist.
| Key | Type | Value |
|---|---|---|
| Privacy - Location Always Usage Description | String | Explain in few word the reason for what you are using the location |
| Privacy - Location When In Use Usage Description | String | Explain in few word the reason for what you are using the location |
| Privacy - Location Always and When In Use Usage Description | String | Explain in few word the reason for what you are using the location |
The environment should be "sandbox" unless you have received the agreement from Roofstreet to use a production platform.
AppDelegate
In your AppDelegate.m add the following
1. Import Veery SDK
At the top of your AppDelegate.m:
@import Veery;
2. Create a Veery object
    @implementation AppDelegate
    Veery *veery ;
3. Veery initialization
in didFinishLaunchingWithOptions function add the following
    @implementation AppDelegate
    Veery *veery ;


    - (BOOL)application:(UIApplication *)application didFinishLaunchingWithOptions:(NSDictionary *)launchOptions
    {
        NSURL *jsCodeLocation;

        jsCodeLocation = [[RCTBundleURLProvider sharedSettings] jsBundleURLForBundleRoot:@"index" fallbackResource:nil];

        RCTRootView *rootView = [[RCTRootView alloc] initWithBundleURL:jsCodeLocation
                                                                                                            moduleName:@"VeeryDemoReactNative"
                                                                                             initialProperties:nil
                                                                                                     launchOptions:launchOptions];
        rootView.backgroundColor = [[UIColor alloc] initWithRed:1.0f green:1.0f blue:1.0f alpha:1];
        self.window = [[UIWindow alloc] initWithFrame:[UIScreen mainScreen].bounds];
        UIViewController *rootViewController = [UIViewController new];
        rootViewController.view = rootView;
        self.window.rootViewController = rootViewController;
        [self.window makeKeyAndVisible];
        //TO DO : Add this
        veery =  [[Veery alloc] init];

        return YES;
    }
    ....
    ....
    @end
4. And then in your AppDelegate implementation add the following:
    // Required to register for notifications
    - (void)application:(UIApplication *)application didRegisterUserNotificationSettings:(UIUserNotificationSettings *)notificationSettings
    {

    }
    // Required for the register event.
    - (void)application:(UIApplication *)application didRegisterForRemoteNotificationsWithDeviceToken:(NSData *)deviceToken
    {
            // TODO Let veery know the device token
     [veery setAPNSTokenWithToken:deviceToken];
    }
    // Required for the notification event. You must call the completion handler after handling the remote notification.
    - (void)application:(UIApplication *)application didReceiveRemoteNotification:(NSDictionary *)userInfo
      fetchCompletionHandler:(void (^)(UIBackgroundFetchResult))completionHandler
    {
            if (![veery apnsMessageHandler:userInfo]){
        // Veery did not recognize the notification so it comes from another framework

        // Your own Handle code here
        };
    }
    // Required for the registrationError event.
    - (void)application:(UIApplication *)application didFailToRegisterForRemoteNotificationsWithError:(NSError *)error
    {
     //
    }
App.ios.js
The following code is required in the App.ios.js
- connect the veery agent service when the app is starting
- Set the API Key Secret
- Activate the required functionalities (see ) (foreground geolocation, background geolocation, geoprofiling, predictive geolocation)
Import Veery
In your App.ios.js, add the following
import Veery from 'react-native-veery';
Connect the service, declare the API Secret and start firebase
In your App.ios.js, add the following
        import React, { Component } from 'react';
        import {Platform,StyleSheet,Text,Button,View} from 'react-native';
        import Veery from 'react-native-veery';


        export default class App extends Component<{}> {

            componentWillMount(){
                // TODO : Connect to the service and start it if it was off
                    Veery.serviceConnect();
                // TODO : declare your API KEY Secret
                    Veery.setApiKeySecret('SuPeRScrET12345789GhJ');

                }

            render() {
                return(
                            <View >
                                <Text > Welcome to VeeryDemoReactNative!</Text>
                            </View>
                            );}
                    }
Activate the required functionality level
You should activate the necessary functionality level for every mobile user (see the full documentation to check which level is required for the functionalities you want to use).
Requires react-native-veery 1.4.4
1 - Check your Geolocation mode
- FOREGROUND_GEOLOC : geolocalize the user only when the application is in foreground.
- BACKGROUND_GEOLOC : geolocalize the user also when the application is in background.
2 - check veery backend services needed to your App
- COLLECT : Veery will be connected to the backend for historization.
- ROUTE_MATCH : Veery will receive trips computations.
- POINT_OF_INTEREST : Veery will receive Points of interests.
- PREDICTION : Veery will receive Predictions.
Backward compatibility (older than react-native-veery 1.4.4)
- FOREGROUND : This is equivalent to Veery.FOREGROUND_GEOLOC.
- BACKGROUND : This is equivalent to Veery.BACKGROUND_GEOLOC.
- BACKEND : This is equivalent to BACKGROUND + Veery.COLLECT + Veery.ROUTE_MATCH.
- GEOPROFILE : This is equivalent to BACKEND + Veery.POINT_OF_INTEREST + Veery.PREDICTION.
You can do that operation whenever you want to activate the user but you should notice that ios will request for required the user rights when called.
    import React, { Component } from 'react';
    import {Platform,StyleSheet,Text,Button,View} from 'react-native';
    import Veery from 'react-native-veery';


    export default class App extends Component<{}> {
            componentWillMount(){
                // TODO : Connect to the service and start it if it was off
                        Veery.serviceConnect();
                // TODO : declare your API KEY Secret
                        Veery.setApiKeySecret('SuPeRScrET12345789GhJ');
                // TODO : Activate the required function levels (user will be requested to accept geolocation)
                //
                //  Veery.activate(Veery.GEOPROFILE);
                // Requires react-native-veery 1.4.4
                //  Veery.activate(Veery.BACKGROUND_GEOLOC  | Veery.COLLECT | Veery.ROUTE_MATCH | Veery.POINT_OF_INTEREST | Veery.PREDICTION );
                     }

            render() {
                    return(
                            <View >
                                <Text > Welcome to VeeryDemoReactNative!</Text>
                            </View>
                            );}
                    }
This call can be made when the application starts (just after veery.serviceConnect()) but also after you have explained to the user why you require the Background Location right.
BACKEND and GEOPROFILE implies backend charges for every mobile where it is executed. Contact us for details.
Next Steps
Once this compile and runs, you are ready to ask to Veery about the geoprofile and predictions of trips of your users