Quickstart step 4 : React Native Integration (Android)
Here are the steps required for a minimum integration of the Veery Geo-predictive SDK inside your React Native application.
Prerequisites
You should have requested your Developer API Key and received it in the following format:
| YOURCOMPANY ACCESS KEY | Where to use in Android Studio | Value (example) |
|---|---|---|
| CLIENT_ID | AndroidManifest.xml | 00000000-1234-abcd-efbh-1234567890ab |
| API_KEY | AndroidManifest.xml | abcdef12-0123-4567-890a-bcdef1234567 |
| API_SECRET | MainActivity.java -> veery.setApiKeySecret(...) | SuPeRScrET12345789GhJ |
These will be used in the next steps of the Veery integration.
Install react-native-veery
$ npm install
$ npm install react-native-veery --save
Note
To update react-native-veery, run the following
$ npm update react-native-veery --save
Automatic installation
You can skip the manual installation if you use
$ react-native link react-native-veery
Manual installation
- Open up
android/app/src/main/java/[...]/MainApplication.java - Add
import com.roofstreet.rn.veery.RNVeeryPackage;to the imports at the top of the file -
Add
new RNVeeryPackage()to the list returned by thegetPackages()method@Override protected List<ReactPackage> getPackages() { return Arrays.<ReactPackage>asList( new MainReactPackage(), new RNVeeryPackage(), ); }
-
Append the following lines to
android/settings.gradle:include ':react-native-veery' project(':react-native-veery').projectDir = new File(rootProject.projectDir, '../node_modules/react-native-veery/android')
-
Insert the following lines inside the dependencies block in
android/app/build.gradle:compile project(':react-native-veery')
AndroidManifest.xml
In your AndroidManifest.xml file you shoud add the following (using the credentials received from your API KEY registration):
  <application
  ...
  ...
   <meta-data
        android:name="com.roofstreet.veery.API_KEY"
        android:value="abcdef12-0123-4567-890a-bcdef1234567" />
   <meta-data
        android:name="com.roofstreet.veery.CLIENT_ID"
    android:value="00000000-1234-abcd-efbh-1234567890ab "/>
   <meta-data
        android:name="com.roofstreet.veery.ENVIR"
        android:value="sandbox"/>
The environment should be "sandbox" unless you have received the agreement from Roofstreet to use a production platform.
You have two way to use Firebase Cloud Messaging
1. Add Firebase Cloud Messaging in the native code"
Enable Firebase Cloud Messaging
If you did not included firebase notifications in your application yet, you should do the following:
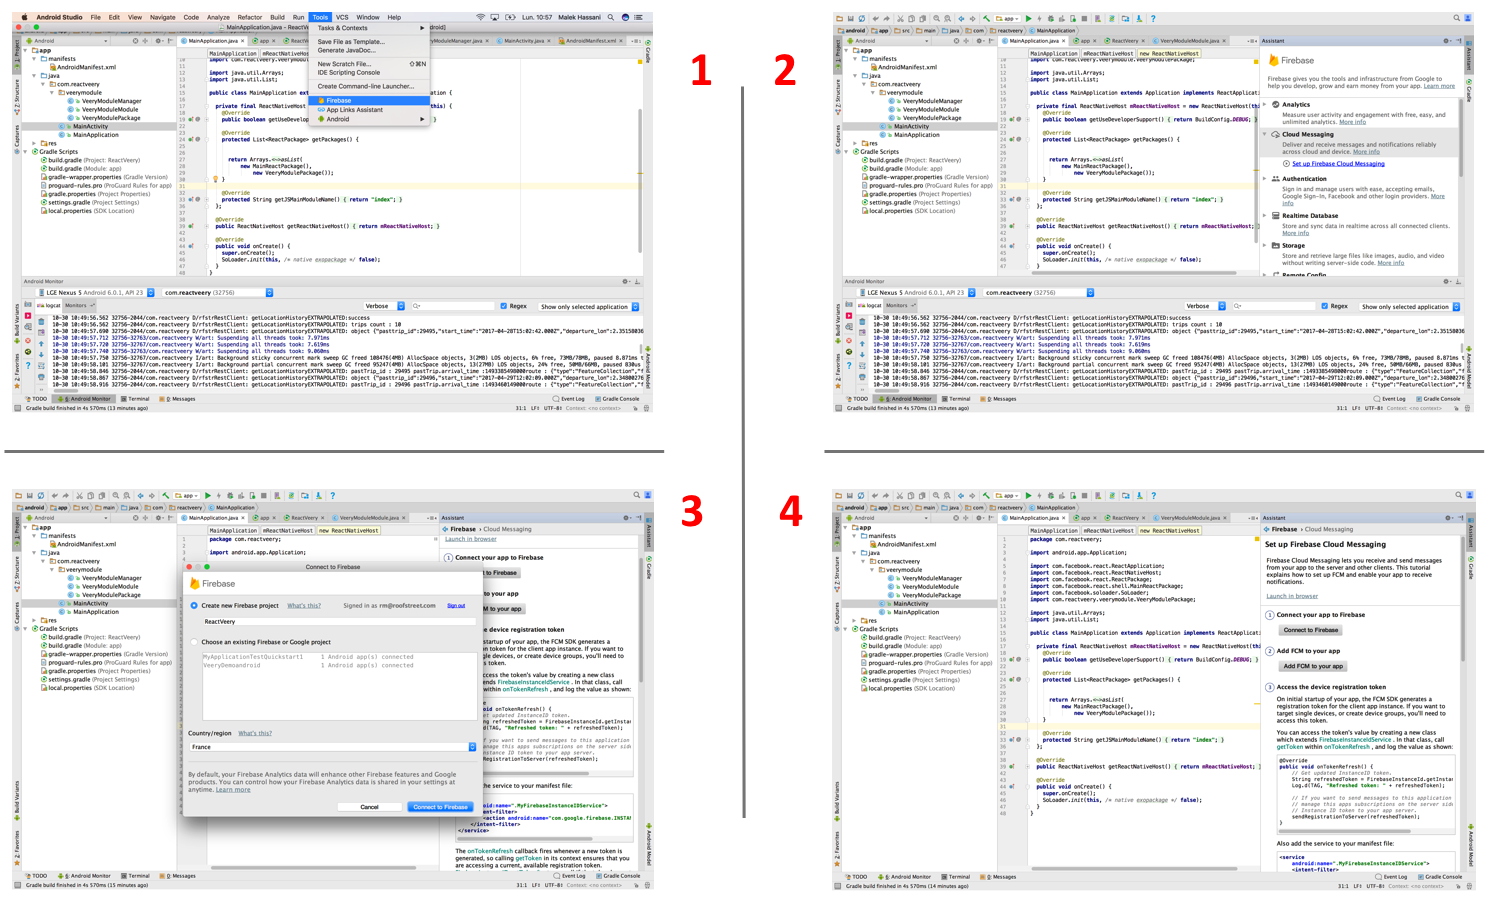
In Android Studio, Use the menu item Tools > Firebase > Cloud Messaging > Set up Firebase Cloud Messaging (require Android studio 2.3.3 minimum)
 .
.
This procedure will create the two classes MyFirebaseInstanceIDService and MyFirebaseMessagingService required in the next steps.
MyFirebaseInstanceIDService.java
The FirebaseInstanceIdService class is used to receive the FCM device token that Veery requires to
- Silently communicate with the Veery Backend (receive internal events)
- Send Push Notifications to your users if you decided to use Veery for the Notifications
So the following step is mandatory or Veery will not properly work within your application.
 // TODO : Import the Veery Library
 import com.roofstreet.android.veery.Veery;

 public class MyFirebaseInstanceIDService extends FirebaseInstanceIdService {

     // TODO : Declare a persistant Veery Object
     Veery veery = new Veery(this);

     @Override
     public void onTokenRefresh() {

                 try {
                     Looper.prepareMainLooper();
                 }catch (RuntimeException e){
                     Log.e("MyFirebase", "onTokenRefresh : RuntimeException " + e.toString());
                 }
         // TODO : Let Veery know the Device Token
         veery.setFirebaseToken(FirebaseInstanceId.getInstance().getToken());

     }
 }
MyFirebaseMessagingService.java
The FirebaseMessagingService class is used when receiving a Push notification.
Veery Uses Silent notifications to save battery and geolocalize or comunicate only when the predictive backend requires it.
So the following code redirect the notifications to the Veery Agent. If the agent note that the notification, it returns true so you know this message does not concerns another framework or your own code.
 // TODO : Import the Veery Library
 import com.roofstreet.android.veery.Veery;

 public class MyFirebaseMessagingService extends FirebaseMessagingService {
     String TAG = "MyFirebaseMessagingService";

     // TODO : Declare a persistant Veery Object
     Veery veery = new Veery(this);

     @Override
     public void onMessageReceived(RemoteMessage remoteMessage) {

                 try {
                        Looper.prepareMainLooper();
                 }catch (RuntimeException e){
                        Log.e("MyFirebaseMessaging", "onMessageReceived : RuntimeException " + e.toString());
             }
         // TODO : if veery can handle the notification, just return
         if (veery.firebaseMessageHandler(remoteMessage)) return;

         // Veery did not recognize the notification so it comes from another framework

         // Your own Handle code here
    }
    // There is more code generated by android studio here (no change)
 }
2. Add Firebase Cloud Messaging using 'react-native-firebase'
If you already use react-native-firebase you can go to the next step (Transfer Veery silent notifications to the Veery library).
Install React Native Firebase modules
1. Install the library
$ npm install --save react-native-firebase
2. Setup google-services.json
A google-services.json file contains all of the information required by the Firebase Android SDK to connect to your Firebase project.
Logon to your Google Firebase console and in the project created previously in Register to veery step download the google-services.json.
-
Select the project
-
click in settings
-
download google-services.json
Once downloaded, copy this file to the root of your project at android/app/google-services.json.
If you want learn more about this see add Firebase to your app.
In order for Android to parse this file, add the google-services gradle plugin as a dependency to your project in the project level build.gradle file:
buildscript {
    // ...
    dependencies {
    // ...
    classpath 'com.google.gms:google-services:3.1.1'
    }
}
To apply the plugin to your project, add the following to the VERY BOTTOM of your app android/app/build.gradle file:
apply plugin: 'com.google.gms.google-services'
3. Add Firebase modules
The Firebase modules need to be installed as project dependencies. In the android/app/build.gradle file, add the following:
    dependencies {
        // This should be here already
        compile(project(':react-native-firebase')) {
        transitive = false
    }

    // Firebase dependencies
    compile "com.google.android.gms:play-services-base:11.4.2"
    compile "com.google.firebase:firebase-core:11.4.2"
            compile "com.google.firebase:firebase-messaging:11.4.2"

    ...
Update Google Play service maven repository
Google Play services require their dependencies to be downloaded from Google's Maven repository so add the required reference to the repositories section of the project level build.gradle (android/build.gradle):
    allprojects {
        repositories {
            mavenLocal()
            jcenter()
            maven {
                // All of React Native (JS, Obj-C sources, Android binaries) is installed from npm
                url "$rootDir/../node_modules/react-native/android"
            }
            // -------------------------------------------------
            // Add this below the existing maven property above
            // -------------------------------------------------
            maven {
                url 'https://maven.google.com'
            }
        }
    }
Include react-native-firebase to your project
Add the following in the android/settings.gradle
  include ':react-native-firebase'
  project(':react-native-firebase').projectDir = new File(rootProject.projectDir,'../node_modules/react-native-firebase/android')
Open up android/app/src/main/java/[...]/MainApplication.java
-
Add the following to the imports at the top of the file
import io.invertase.firebase.RNFirebasePackage;
import io.invertase.firebase.messaging.RNFirebaseMessagingPackage;
-
Add
new RNFirebasePackage()andnew RNFirebaseMessagingPackage()to the list returned by thegetPackages()method@Override protected List<ReactPackage> getPackages() { return Arrays.<ReactPackage>asList( new MainReactPackage(), new RNVeeryPackage(), new RNFirebasePackage(), new RNFirebaseMessagingPackage() ); }
Add messaging service in Manifest.xml
<application ...>
<service
android:name="io.invertase.firebase.messaging.MessagingService"
android:enabled="true"
android:exported="true">
    <intent-filter>
        <action android:name="com.google.firebase.MESSAGING_EVENT" />
    </intent-filter>
</service>
<service android:name="io.invertase.firebase.messaging.InstanceIdService" android:exported="false">
<intent-filter>
    <action android:name="com.google.firebase.INSTANCE_ID_EVENT"/>
</intent-filter>
</service>
To learn more about this see React Native Firebase Android installation
Transfer Veery silent notifications to the Veery library
In your App.android.js file add the following lines
  import Veery from 'react-native-veery';
  import RNFirebase from 'react-native-firebase';

  const configurationOptions = {
      debug: true
  };

  const firebase = RNFirebase.initializeApp(configurationOptions);

  firebase.messaging().getToken()
    .then((token) => {
      console.log('Device FCM Token: ', token);
      Veery.setVeeryToken(token);
  });
  firebase.messaging().getInitialNotification()
    .then((notification) => {
      console.log('Notification which opened the app: ', notification);
  });
  firebase.messaging().onMessage((message) => {
    // TODO
      console.log('onMessage: ', message);
      Veery.VeeryNotificationHandler(message, (response) =>{
        console.log('response',response);
    })
  });
  firebase.messaging().onTokenRefresh((token) => {
    console.log('Refreshed FCM token: ', token);
    Veery.setVeeryToken(token);
});
App.android.js
The following code is required in the App.android.js
- connect the veery agent service when the app is starting
- Set the API Key Secret
- Activate the required functionalities (see ) (foreground geolocation, background geolocation, geoprofiling, predictive geolocation)
Import Veery
In your App.android.js, add the following
import Veery from 'react-native-veery';
Connect the service, declare the API Secret and start firebase
In your App.android.js, add the following
    import React, { Component } from 'react';
    import {Platform,StyleSheet,Text,Button,View} from 'react-native';
    import Veery from 'react-native-veery';
    import RNFirebase from 'react-native-firebase';
// TODO : initialize firebase
    const configurationOptions = {
            debug: true
    };

    const firebase = RNFirebase.initializeApp(configurationOptions);

    firebase.messaging().getToken()
        .then((token) => {
            console.log('Device FCM Token: ', token);
            // TODO Let veery know the Firebase token
            Veery.setVeeryToken(token);
    });
    firebase.messaging().getInitialNotification()
        .then((notification) => {
            console.log('Notification which opened the app: ', notification);
    });
    firebase.messaging().onMessage((message) => {
        // TODO
            console.log('onMessage: ', message);
            Veery.VeeryNotificationHandler(message, (response) =>{
                console.log('response',response);
        })
    });
    firebase.messaging().onTokenRefresh((token) => {
        console.log('Refreshed FCM token: ', token);
        Veery.setVeeryToken(token);
    });

    export default class App extends Component<{}> {

        componentWillMount(){
            // TODO : Connect to the service and start it if it was off
                    Veery.serviceConnect();
            // TODO : declare your API KEY Secret
                    Veery.setApiKeySecret('SuPeRScrET12345789GhJ');

                }

        render() {
            return(

                    <View >
                        <Text > Welcome to VeeryDemoReactNative!</Text>
                    </View>

                );}
        }
Activate the required functionality level
You should activate the necessary functionality level for every mobile user (see the full documentation to check which level is required for the functionalities you want to use).
Requires react-native-veery 1.4.4
1 - Check your Geolocation mode
- FOREGROUND_GEOLOC : geolocalize the user only when the application is in foreground.
- BACKGROUND_GEOLOC : geolocalize the user also when the application is in background.
2 - check veery backend services needed to your App
- COLLECT : Veery will be connected to the backend for historization.
- ROUTE_MATCH : Veery will receive trips computations.
- POINT_OF_INTEREST : Veery will receive Points of interests.
- PREDICTION : Veery will receive Predictions.
Backward compatibility (older than react-native-veery 1.4.4)
- FOREGROUND : This is equivalent to Veery.FOREGROUND_GEOLOC.
- BACKGROUND : This is equivalent to Veery.BACKGROUND_GEOLOC.
- BACKEND : This is equivalent to BACKGROUND + Veery.COLLECT + Veery.ROUTE_MATCH.
- GEOPROFILE : This is equivalent to BACKEND + Veery.POINT_OF_INTEREST + Veery.PREDICTION.
You can do that operation whenever you want to activate the user but you should notice that android will request for required the user rights when called.
    import React, { Component } from 'react';
    import {Platform,StyleSheet,Text,Button,View} from 'react-native';
    import Veery from 'react-native-veery';
    import RNFirebase from 'react-native-firebase';
    // TODO : initialize firebase
    const configurationOptions = {
            debug: true
    };

    const firebase = RNFirebase.initializeApp(configurationOptions);

    firebase.messaging().getToken()
        .then((token) => {
            console.log('Device FCM Token: ', token);
            // TODO Let veery know the Firebase token
            Veery.setVeeryToken(token);
    });
    firebase.messaging().getInitialNotification()
        .then((notification) => {
            console.log('Notification which opened the app: ', notification);
    });
    firebase.messaging().onMessage((message) => {
        // TODO
            console.log('onMessage: ', message);
            Veery.VeeryNotificationHandler(message, (response) =>{
                console.log('response',response);
        })
    });
    firebase.messaging().onTokenRefresh((token) => {
        console.log('Refreshed FCM token: ', token);
        Veery.setVeeryToken(token);
    });

    export default class App extends Component<{}> {

        componentWillMount(){
            // TODO : Connect to the service and start it if it was off
                    Veery.serviceConnect();
            // TODO : declare your API KEY Secret
                    Veery.setApiKeySecret('SuPeRScrET12345789GhJ');
            // TODO : Activate the required function levels (user will be requested to accept geolocation)
            //
                Veery.activate(Veery.GEOPROFILE);
            // Requires react-native-veery 1.4.4
            //Veery.activate(Veery.BACKGROUND_GEOLOC  | Veery.COLLECT | Veery.ROUTE_MATCH | Veery.POINT_OF_INTEREST | Veery.PREDICTION );
                }

        render() {
            return(

                    <View >
                        <Text > Welcome to VeeryDemoReactNative!</Text>
                    </View>

                );}
        }
This call can be made when the application starts (just after veery.serviceConnect()) but also after you have explained to the user why you require the Background Location right.
BACKEND and GEOPROFILE implies backend charges for every mobile where it is executed. Contact us for details.
Next Steps
Once this compile and runs, you are ready to ask to Veery about the geoprofile and predictions of trips of your users